
What is the point of having a camera (or digital device) with ginormous giga-megapixels if you're only going to put it on Facebook, anyway?
Because someday you might actually want to print something, that's why. Like a life-sized poster or billboard on the side of a building. (Seriously, that seems to be the direction these phone cameras are going.) Or maybe you want to put it on your wall or in a book? Great. You've got all the pixels you need.
Except that when you try to email this gorgeous gaggle of pixels to someone else, it arrives the size of half a postage stamp. Or maybe it looks great on the screen, but your printer tells you the file is too small to look good in print.
So what to do? It takes a little digging, but you can email a photo in its native resolution. I've done some digging for you, so read on to find out how to do it on your device.
Email from your Windows computer
Now that you have properly scanned your printed images in high resolution on your computer, you want to keep them that way! (If you need tips for proper scanning, check out this post.) In most email software, the easiest way to send a large photo is to attach the photo to the email. Here's a screen shot from Windows Live Mail (the concept is the same for other email software as well):

You can either click on "attach file" and navigate to where the photo resides on your computer, or if the photo is handy you can drag it directly anywhere into the email.
You can You can either click on "attach file" and navigate to where the photo resides on your computer, or if the photo is handy you can drag it directly anywhere into the email.
After attaching it, you will most likely see just the file name like this:

Your attachment will show up in the attachment bar just beneath the subject.
The size of the original file is listed next to the filename, so you can make sure it's the full size. (You can ignore all the "photo album tools" at the top, because the point in this case is not to mess with it anyway.)
You can attach multiple photos to an email, but be careful that the total size of the files doesn't exceed your (or your recipient's) ISP's file size limitation (usually anywhere from 10 to 25 megabytes).
Many people use the "insert photo" tool, which sometimes causes problems, because it defaults to a smaller size. You can use it as long as you change the setting as shown below:

Attaching the photo is generally easier than using the "insert photo" tools, but if you do use them, make sure to set the file size you want.
As you'll notice in the above example, the default is set to "medium," so it's important to set this to "original" instead to retain the full resolution.
Emailing from Picasa
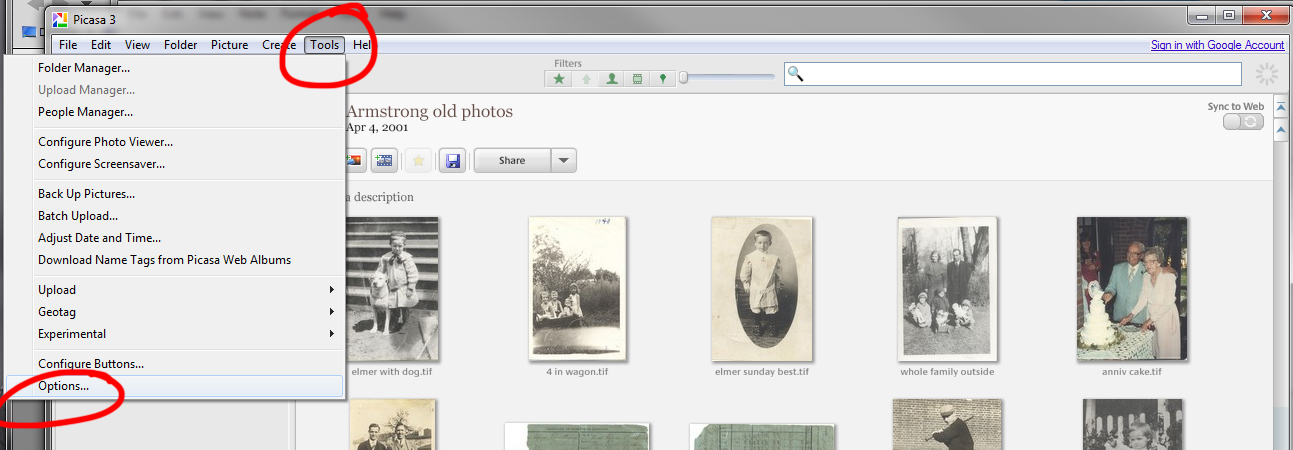
Emailing a photo from Picasa is easy, but make sure you set the default file size.
Picasa is a popular free photo organization tool from Google. But many times when clients have emailed us photos from their Picasa folders, we get the small end of the stick. Here's how to fix it:
Click on the photo you want to send; then click "Tools" and choose "Options" as shown above. Then you will get a menu that looks like this:

Under the email tab, set the default size to "original size."
Click on the "Email" tab and choose "original size" in the "size for single pictures" option. Note: you cannot send multiple photos from Picasa and maintain their original size. You must send them one at a time.
Emailing from a Samsung phone

This menu on my Samsung Galaxy Note pops up every time I email a photo.
Emailing a photo from my Samsung Galaxy Note is super easy. From the Gallery or camera roll, choose a photo and click on the email icon (looks like an envelope). You will get this nifty pop-up menu which lets you choose the file size. (You can set the default here to "Always," but you may want to choose "Just once" each time if you also routinely want to email smaller photos for web use as well.)
Many Samsung phones and tablets have similar features, so this same menu should appear on any number of Samsung devices.
Emailing from an iPad
Emailing a full-res photo from an iPad is a little trickier because it's not intuitive; you have to know where the setting is. So without further ado, I will show you:

Emailing a full-res photo from an iPad is a tad more obscure. (You can tell that I only use my iPad to photograph food. This is my cherry-rhubarb cream cheese tart. If you want the recipe, let me know!)
Go to your "Photos" icon, click on the photo you want to send, and then find that little icon that looks like a piece of paper with an arrow on the top. (Sorry, fanboyz, sometimes the way Apple does stuff is just stupidly obscure. It's like you have to keep all these secret combinations in your head just to operate your device...)
Then click the Mail icon and a message window pops up. Here's what you would never know if I didn't show you: if you click on the word "Images" (to the right of the Cc/Bcc line), you will get a popup menu like this:

The hidden image size menu on my iPad.
Voila! Choose "Actual size" and send, and you're done!
Emailing from other phones
Since I don't have an iPhone to test, I suspect that you might find the same menu in the same place when emailing from your iPhone. (iPhone users out there, let me know if I'm wrong!) Of course, there so many different smartphones that I can't possibly cover them all. But it's a pretty safe bet that if you dig a little deeper (or Google it) you can find the "original file size" setting on your device.