This year, you've decided that you're going to complete that family history book in time for the family reunion. Now your book is nearly done, and your aunt and your sisters have offered to help give you feedback and proofread it before you send it to the printer. (Or perhaps to a professional who will design your book for you).
Now what? Do you print a draft copy for each family member, have each one mark up their copy, and then go through each copy line by line to make the corrections to the original document? Hmmm, that seems like a duplication of effort. Or do you email them an electronic copy and have them email corrections back to you? Comments could easily fall through the cracks of your inbox. What if there are things that you disagree about, and they need to be discussed?
Cloud sharing to the rescue! We've found a pretty efficient way to handle proofing with multiple people, so we thought we'd share it with you.
When we work on a family history or personal history book for a client, there are often several people in the family who want to look it over before it goes to print. We have started using Dropbox for collaborative commenting: we upload a PDF of the proof to our Dropbox account, and then we send a link to each person that needs to see and comment on it. This way, anyone who has the link can view and comment--even if they don't have a Dropbox account.
NOTE: this method I'm about to show you works only for commenting on what needs to be changed; it does not allow everyone to independently make changes to the same document. (For that kind of real-time editing collaboration, each collaborator needs to have Dropbox installed and the document shared in a specified group or team. Since that isn't our particular workflow, I'm not one to give advice on how to do that. But if collaborative editing is what you need, you can read more about it here.)
Since I will be making all the final edits in my professional design software, collaborative commenting provides a simple way for me to efficiently get feedback from everyone before the final edits are made. (This comment-only method also prevents Aunt Susie from accidentally deleting half the pages.)
'NUTHER NOTE: This method requires all users to have an internet connection while viewing and commenting on the document "in the cloud." (It is possible to use Dropbox offline, but you would need to each have an account with enough storage as outlined in the previous paragraph, download the desktop app and sync to it, etc. That's all too confusing for what we're trying to accomplish, which is why we're showing you this easier way.)
1. Upload the document to your Dropbox account and send everyone the link.
We have a paid Dropbox account that has plenty of storage, so we start by dragging the proof document (in this case a PDF, but could be a Word file or other document) into a folder in our Dropbox account. (The person who is to upload the document must have a Dropbox account. If you don't have one, you can get a free account with up to 2GB storage.)
In my Dropbox dashboard I have created a new folder called "Joyce Taylor book." I have dragged the document from my computer desktop into this folder. It takes a minute or two to upload.
See the Share button? (There is also a Share Folder button. Ignore it.) Click the Share button.
Click on the Copy link button. This will copy the link into your clipboard, which you can then paste into an email (or several).
You can now see the highlighted link and the indication that it has been copied to your clipboard. (Ignore the "To: email" box asking for an email address, and the "add people.") You will paste this link into your own email client instead. (This "add people" function will require recipients to have a Dropbox account to view it, which is what we don't want.)
Optional--you can click the Link Settings if you want more control (such as adding a password or expiry date) in case you are afraid that your creepy ex-brother-in-law might hack into your sister's email, click on the link, and leave a snarky comment. We don't usually bother with this, but it's there if you need it.
I'm sending this to Tom for his comments, so I've pasted the link into the body of my email. I can also add other names to the CC or Bcc lines that I want to send it to. Or I can send individual emails and paste the link into each one. Note: this link will only give them access to that specific document. They will not be able to see or access anything else in your Dropbox account.
2. Watch as recipients start commenting
Tom gets my email, clicks on the link, and Wallah! The first page of the Joyce Taylor draft appears in his Dropbox dashboard. He has a Dropbox account, so it has automatically logged him in. You can see his avatar (a tiny pic of us) in the upper right. If the recipient has a Dropbox account but no avatar, it will show his initials in the circle instead.
When you mouse over the page, a menu bar appears. This allows you to zoom, navigate from page to page, and make comments (which we will show you next).
If the recipient does not have a Dropbox account, or is not signed in, the avatar will be a circle with a question mark.
Tom pages down to page two and wants to make a comment. At the far right on the menu bar is a square icon with a plus sign in the corner, which when moused over reads "comment on specific areas."
He clicks on the "comment" icon and it gives him an instruction to "click and drag to comment on areas." (If you click "done," the menu bar comes back.)
When the mouse hovers over text, the cursor turns into a text-insertion icon (looks like a sideways dumbbell). Click and drag it across the text you want to highlight. You can highlight a single letter, word, sentence, or paragraphs. It may take you a minute to get used to the feel of the highlighting cursor. If you highlight the wrong words and want to cancel the highlight, clicking anywhere on the document once will reset it, and you can try again.
When you release the cursor, you'll see the black "add comment" box pop up. Click on it.
Up pops a comment box, into which you can now type your comment(s). Click "post" and the comment is deposited into the window on the right of the dashboard. (If you want to delete an unposted comment, just click "cancel." You can also delete a comment after posting.)
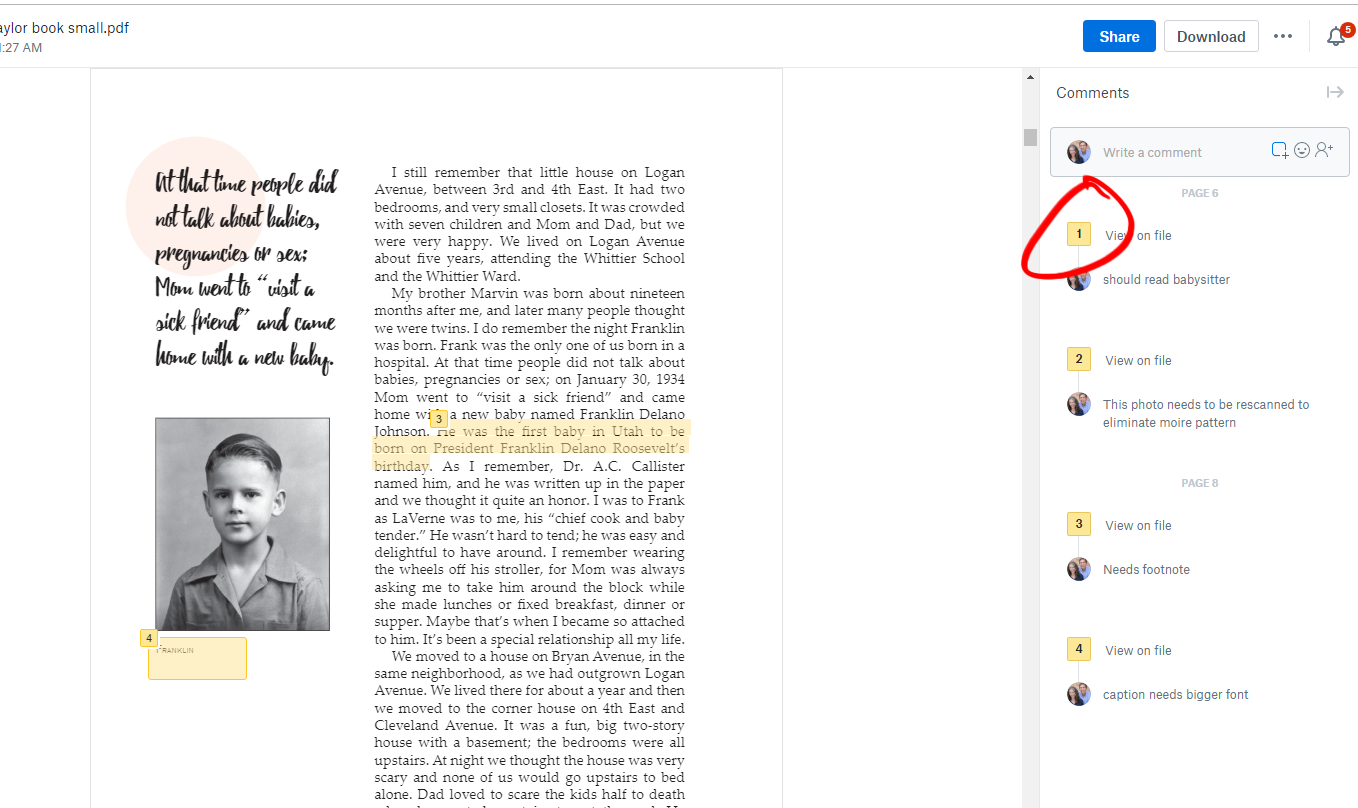
The comment is now listed in the window on the right of the dashboard. The number on the comment corresponds to the number next to the highlighted text. Everyone who has access to the link will now be able to see this comment when they open the document.
When click/dragging somewhere other than on text, such as an image or blank space, the cursor changes to a box icon with which you can highlight a rectangle. Then you can comment on an image or other element in the document in the same way.
You can continue to page down and make comments. Each comment has a unique number and shows in a list on the right. If you click on the number in the comment column, and it will take you to the location in the document. So if you click on #1, it will jump back to page 2 where the first comment was made.
Now that Tom has made a few comments, I want to see what he has said and make a few comments of my own. So I log in to my Dropbox account and click on the file I uploaded earlier. (Now my avatar is showing in the comment log.) Under Tom's first comment, I click "reply," add a comment of my own, and click "post." We can have a whole discussion about this here if we want to. (Although usually it's just easier for us to walk into the next room to discuss things.)
3. Use Dropbox comments column as a reference when editing your original document.
When all the invited people have had a chance to proof the document and make their comments (or when you, as author, have decided that you've waited long enough and they've had their chance to contribute), you can refer to the comments column as a reference when making your edits to your original document (in Word, InDesign, whatever). After you have made the change to your original document in its native software, you can then click "resolve" in the Dropbox version for each comment. "Resolve" doesn't have any affect on your original; it just disappears the comment from the column. It's kind of like ticking a checkbox or crossing something off the list, so you know you've made that change. (You can "show" the resolved comments again if you need to see them.)
I'm fortunate enough to have three monitors on my computer, so I can keep this Dropbox version open on the left screen, while I have my InDesign file open on my main screen to edit the original. But if you don't have multiple monitors, you can still view the two side by side or flip from one window to another while working.
It's handy for me to see everyone's comments listed in the order they appear in the document, all in the same place! Much easier than juggling multiple printed copies with handwritten comments.
The other benefit to this method is that it cuts down on duplication of effort. If all three of your proofreaders find the same typo, the others will see the comment of the first person who found it and can skip to the next one.
ONE FINAL NOTE: Dropbox has a useful (or extremely annoying, depending on your point of view) notification feature that sends you an email every time someone makes a comment on the document you've uploaded. You can see how this could quickly become an inbox apocalypse if you have five people making multiple comments on each page of your doc and you get an email for every single one. If it's driving you crazy, you can unsubscribe from receiving email notifications for that document by clicking the three dots in the upper right corner. You can re-subscribe again at any time in the same menu.
There are other cloud storage apps (Google Drive, iCloud, and many others) that offer similar methods of collaborating on documents. We happen to use Dropbox with our clients because, well, most people seem to have at least heard of it, and this method works well for us. We hope you find this useful.


