

It's a beautiful summer day, the tomatoes are ripe, the mountains are calling. But it's Monday, which means that I get to write another blog post! Yay! So what topic should I choose for this gorgeous day?
JPEG compression. (Thud.)
OK, so it doesn't sound exciting. But believe me, it's important to understand if you don't want to ruin all your beautiful summer vacation photos.
In the spirit of light summer reading, I'm going to try to make it as simple as possible for ya, with lots of pictures.
When it comes to JPEG compression, there's really only one thing to know:
Compression = BAD. Avoid it at all costs.
Now, there are those who will disagree with this statement: web designer geeks out there trying to make things load super fast for people with slow dial-up connections and they don't much care what the pictures look like.
But that's not you. You are a regular Joe/Jane who is going to make a photo book from your vacation pics or put a few scans in your personal history. So for your purposes, I'm going to show you how to NOT ruin your photos.
Here are 4 things you need to know.
1. What is compression?
Compression chucks a lot of information out of your photo and squishes your pixels into a smaller cyber-box to save space. This is really only useful when uploading photos to websites, and even then it should be used with care to keep photos from degrading.
JPEG is what's known as a "lossy" file format. That doesn't mean all JPEGs are bad, or that you shouldn't use the file format. But JPEGS need to be captured and handled properly in order to keep their good looks, especially when printed.
2. Compression (quality) and resolution (size) are two different issues.
You can have JPEGS scans side by side with the same resolution/pixel dimensions - both, say, 4 x 5 inches at 300 pixels per inch (ppi). But one looks good, and one looks blocky with jagged edges. Why? That's compression. The quality setting at which a JPEG is captured or scanned is just as important as the resolution (ppi) of the photo.
Below is a real-world example. The photo on the left was scanned and sent to us by a client. It looked fine on the screen, but on closer inspection contained some artifacts that would show up when the photo was printed in a book on high-quality paper. The client's photo was scanned at 600 ppi, a high resolution, but at a medium-quality JPEG setting, which caused the artifacts.
The photo on the right was re-scanned at the same resolution but on maximum quality. You can still see the grain from the original film, but the blocky, square artifacts are gone.

Left: scanned at 600 ppi but at medium jpeg quality. Right: scanned at 600 ppi, maximum jpeg quality.
3. Maximum, Highest Quality, Superfine
These are the words you need to remember when capturing JPEG photos, either by scan or in a camera, and when saving them.
Note: if your scanner can capture a .TIF file, we highly recommend using it. TIF uses a "lossless" compression which doesn't cause artifacts. TIFs are larger files, and they cannot be uploaded to a website, but a TIF file will give you a high-quality digital "negative" which you can freely edit without losing quality. You can always make a JPEG copy of your TIF for web use.
Every scanner is different, but if you do scan as a JPEG, find the setting on your scanner which controls compression or jpeg quality, and set it to the highest possible setting. Then set your output resolution to at least 300 ppi (more if you want to crop or make it larger), and you will have a high quality scan. NOTE: Many scanners are set to scan at 72 ppi as their default setting. This is fine for upload, but you will not be able to get a good quality print at that resolution. Make sure to find the manual resolution settings on your scanner.
When taking digital photos, make sure that your camera is also set to an uncompressed setting. (If you know you are only going to upload this to facebook and will never want to print it, ever, then go ahead and use a smaller setting.)
Below is an example of what the quality settings look like on my Canon camera. (Nikons use the terms fine, normal, and basic.)

If you want to be able to print a photo, use the largest file size. If you will only be using these photos to text or socialize, you can fit more on your camera's media by using a smaller size, but still try to avoid the "stairstep" or compressed settings.
Here are some more examples of high/low compression settings:

Here's our original, high quality photo, saved as a TIF file for editing. After all my edits are done, I now want to make a high-quality JPEG copy to upload to a printing site.
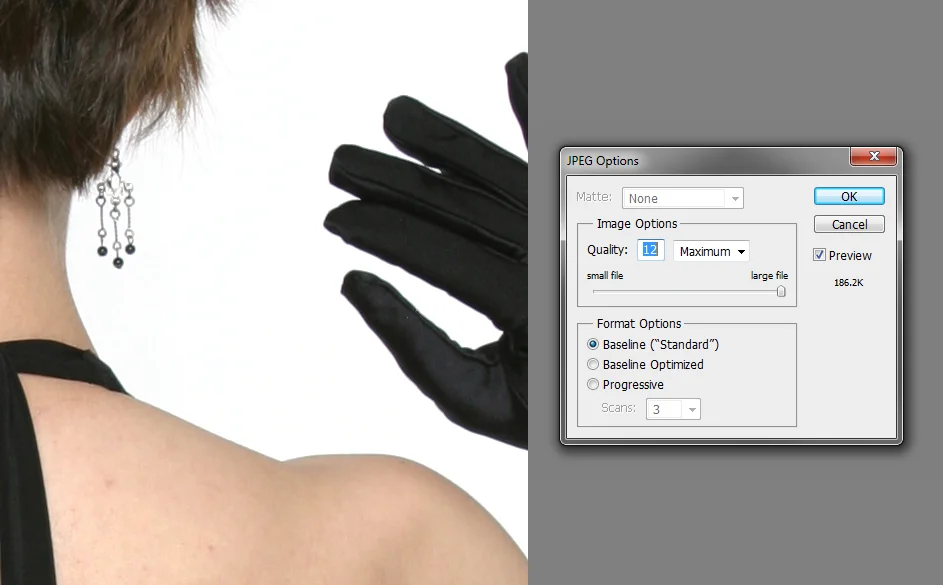
I have saved this at the maximum JPEG quality, or 12 on a scale of 1-12. This will give me a file that will be smaller than the TIF but won't show any difference to the naked eye. Notice that even close up, the high-contrast edges of the photo look smooth.

Now let's see what happens when we save it on a medium quality setting. It still looks pretty good on the screen. But let's look a little closer.

As we get closer, we can see the damage, those square artifacts, jagged edges and color shifts. These will show up much more when printed on paper than they do on the screen. (Saved as 6, medum quality jpeg)

I saved this jpeg image on the lowest setting. This shows artifacts even on the screen, and would look even worse when printed. Notice the blocky color shifts in the white area between her head and hand and the roughness around the edges.
And last but not least:
4. Don't edit your jpegs.
This is probably the least understood attribute about JPEGS: they compress further every time you edit and save them, even at the highest quality setting.
So let's say you take a good photo and decide to tweak it a bit in Photoshop or some other photo editing software. It looks a little blue, so you open it and do an auto color correct. Then you close it. Then you notice that there is a large speck of dirt on your brother's face, so you open it again and remove the speck. Close. Then decide to crop it a little. Open, crop, close. By now you have re-compressed the photo three times, causing subtle or sometimes severe artifacting that may show when printed.
That's another reason why we suggest capturing your photos as TIFs, and do all your editing in the native TIF format, saving the TIF each time. Then when your editing is done, make a JPEG copy at the size you need for uploading purposes.
That's it! If you keep these four things in mind, you will be able to keep your photos looking superfine!
Questions? Post in the comments below. Also, see my nifty infographic here.